Did you know that improperly disinfected nail tools can harbor fungal spores long after they’ve been used? This poses significant risks not only to your clients but to your own health as well. Understanding the best methods for disinfecting these tools is essential. In this discussion, we’ll explore the pros and cons of autoclaving versus chemical soaking, helping you make an informed choice for effective nail care hygiene.
Key Takeaways
- Autoclave sterilization uses high-pressure steam to eliminate all microorganisms, providing the highest level of disinfection for nail tools after fungal exposure.
- Chemical solutions like isopropyl alcohol and hydrogen peroxide can effectively disinfect tools but require proper soaking time to ensure effectiveness.
- Autoclaves may have higher initial costs and longer cycles, but they guarantee complete sterilization compared to chemical methods.
- Chemical disinfection may leave residues that can irritate skin, so thorough rinsing and drying are essential after soaking.
- Regularly review and update disinfection practices, prioritizing the use of EPA-registered disinfectants for effective nail tool hygiene.
Understanding Fungal Infections in Nail Care
Fungal infections in nail care are a common concern, often resulting in discomfort and unsightly nails. You might notice fungal symptoms such as discoloration, thickening, or even brittleness of the nails.
Recognizing these signs early is essential for effective treatment and infection prevention. To minimize the risk of developing a fungal infection, maintain proper nail hygiene by keeping your nails clean and dry.
Avoid sharing personal nail care tools and opt for well-ventilated environments when getting manicures or pedicures. Regularly inspect your nails for any abnormalities, and don’t hesitate to consult a healthcare professional if you suspect an infection.
Importance of Disinfecting Nail Tools
Maintaining clean and properly disinfected nail tools is essential for preventing the spread of infections, particularly after any exposure to fungal issues. You must prioritize nail hygiene to safeguard yourself and your clients from potential infections.
Fungal spores can linger on tools, making it vital to implement effective disinfection protocols. By understanding the significance of disinfecting your tools, you reduce the risk of cross-contamination and enhance overall infection prevention.
Implementing effective disinfection protocols is essential to reduce cross-contamination and enhance infection prevention in nail care.
Regularly sanitizing your equipment not only protects health but also guarantees professional credibility. In a field where precision and safety are paramount, mastering proper disinfection techniques is non-negotiable.
Ultimately, a commitment to nail hygiene reflects your dedication to excellence and client well-being in the nail care industry.
Overview of Autoclave Sterilization
When it comes to guaranteeing the highest level of cleanliness in your nail tools, autoclave sterilization stands out as a reliable method. This technique utilizes high-pressure steam to eliminate bacteria, viruses, and fungi, meeting stringent sterilization standards.
There are various autoclave types, including gravity displacement and vacuum autoclaves, each suited for different applications. Choosing the right type is essential for achieving ideal results.
Autoclaves not only provide thorough sterilization but also make certain that your tools remain safe for client use, reducing the risk of fungal infections.
How Autoclaves Work
To understand how autoclaves work, it’s crucial to grasp their operating principles.
These machines use high-pressure steam to effectively sterilize tools, ensuring that all microbial life is eliminated.
Autoclave Operating Principles
Understanding how autoclaves work is essential for effective sterilization, especially in environments vulnerable to fungal infections.
Autoclave functionality relies on high-pressure steam to eliminate microorganisms, including spores. The process begins by heating water to create steam, which is then injected into a sealed chamber. This chamber maintains elevated temperatures and pressure, often reaching up to 121°C (250°F) at 15 psi.
The combination of heat and moisture penetrates materials, guaranteeing thorough sterilization. Autoclaves utilize specific sterilization techniques, such as gravity displacement and dynamic air removal, to enhance efficacy.
Sterilization Process Explained
The sterilization process in autoclaves is a well-defined method that guarantees nail tools are free from harmful microorganisms, including fungi. This technique utilizes high-pressure steam to achieve effective sterilization.
When you place your tools inside the autoclave, the steam permeates every surface, raising the temperature to a level that destroys pathogens. Typically, a cycle lasts around 15 to 30 minutes, depending on the load and specific sterilization techniques employed.
By ensuring complete exposure to steam, the autoclave greatly enhances infection prevention. After the cycle, tools are safe for reuse, minimizing the risk of fungal infections.
Mastering this process is essential for professionals aiming to uphold the highest standards of hygiene in their practice.
Benefits of Autoclave Sterilization
When you choose autoclave sterilization for your nail tools, you gain complete assurance that all pathogens, including fungi, are eliminated.
This method not only guarantees thorough sterilization but also saves you time compared to other techniques.
Complete Sterilization Assurance
While many cleaning methods can reduce the risk of contamination, autoclave sterilization offers complete assurance by effectively eliminating all microbial life, including stubborn spores.
This method uses high pressure and temperature, ensuring tool safety by penetrating even the most complex instruments.
You can trust that autoclave sterilization not only disinfects but also sterilizes, making it superior to chemical alternatives that may leave behind residues or fail against certain pathogens.
By investing in an autoclave, you’re committing to a standard of excellence in your practice, protecting both yourself and your clients from potential infections.
Ultimately, autoclave sterilization is the gold standard for those who prioritize thorough safety and efficacy in their nail tool disinfection protocols.
Time Efficiency Benefits
Autoclave sterilization not only guarantees thorough disinfection but also greatly enhances time efficiency in your practice.
By utilizing an autoclave, you can considerably shorten the time spent on sterilization compared to chemical soak methods, allowing for better time management. With cycles typically ranging from 15 to 30 minutes, you can quickly turn around your tools, minimizing downtime.
This streamlined process promotes workflow optimization, enabling you to serve more clients without sacrificing safety. Additionally, the hands-off nature of autoclaving reduces the need for constant supervision, freeing you to focus on other essential tasks.
Ultimately, adopting autoclave sterilization can lead to increased productivity and a more efficient practice, ensuring you maintain the highest standards of hygiene while maximizing your valuable time.
Limitations of Autoclave Sterilization
Although autoclave sterilization is widely regarded as one of the most effective methods for disinfecting nail tools, it does have its limitations. You might encounter cost limitations, as autoclaves can be expensive to purchase and maintain. Additionally, effectiveness concerns arise when dealing with tools that have intricate designs, where steam may not penetrate thoroughly.
| Limitation | Description |
|---|---|
| Cost Limitations | Initial purchase and ongoing maintenance can be high. |
| Effectiveness Concerns | Complex tools may not be fully sterilized due to steam penetration issues. |
| Time Requirements | Autoclave cycles can be lengthy, delaying tool availability. |
Understanding these limitations can help you make informed decisions about your sterilization practices.
Overview of Chemical Soak Methods
When it comes to disinfecting nail tools, chemical soak methods offer effective solutions.
You’ll find various types of chemical solutions designed for specific pathogens, each with recommended soaking durations to guarantee thorough disinfection.
Understanding these options will help you maintain a safe and hygienic environment for your clients.
Types of Chemical Solutions
There are several effective chemical solutions for disinfecting nail tools after fungal exposure. These solutions typically include isopropyl alcohol, hydrogen peroxide, and quaternary ammonium compounds.
Each of these chemicals possesses unique chemical properties that contribute to their effectiveness against fungal spores. Isopropyl alcohol, for instance, disrupts cellular membranes, leading to cell death, while hydrogen peroxide generates reactive oxygen species that damage cellular components.
Quaternary ammonium compounds effectively denature proteins and disrupt microbial cell walls. When selecting a solution, consider its concentration and compatibility with your tools to guarantee solution effectiveness.
Understanding these chemical properties will enhance your disinfection process and help maintain a safe environment for your clients.
Soaking Duration Recommendations
To effectively disinfect nail tools after fungal exposure, it’s crucial to adhere to specific soaking duration recommendations based on the chosen chemical solution.
Following these duration guidelines guarantees that you eliminate any harmful pathogens and maintain a safe environment for clients.
- Bleach Solutions: Soak for 10 minutes to achieve effective disinfection, assuring thorough coverage.
- Alcohol Solutions: A minimum of 30 minutes is recommended to ensure the eradication of fungi and bacteria.
- Antiseptic Soaks: Aim for a soaking duration of at least 15 minutes for ideal results.
Common Chemicals Used for Soaking
Although many chemicals can effectively disinfect nail tools after fungal exposure, some stand out for their efficacy and safety.
Common disinfectants like 70% isopropyl alcohol and hydrogen peroxide are popular choices for soaking techniques. These solutions penetrate and eliminate fungal spores while being safe on metal tools.
Another effective option is sodium hypochlorite, often diluted to prevent corrosion. Quaternary ammonium compounds, or quats, are also widely used due to their broad-spectrum antimicrobial properties.
Sodium hypochlorite and quaternary ammonium compounds are effective disinfectants with broad-spectrum antimicrobial properties.
When selecting a chemical, consider both the tool material and the contact time required for effective disinfection. Always follow manufacturer guidelines to guarantee thorough soaking and ideal results, maintaining the integrity of your nail tools while ensuring they’re free from harmful fungi.
Benefits of Chemical Soak Methods
Using chemical soak methods for disinfecting nail tools offers numerous advantages that enhance both safety and efficiency.
These methods guarantee your tools are effectively sanitized, protecting both you and your clients from potential infections.
- Time Efficiency: You can soak multiple tools simultaneously, streamlining your workflow.
- Chemical Efficacy: When using the right solution concentration, you achieve higher levels of disinfection compared to some other methods.
- Ease of Use: Chemical soak methods require minimal training, allowing you to focus on your craft rather than complex processes.
Limitations of Chemical Soak Methods
While chemical soak methods are effective for disinfecting nail tools, they do have notable limitations that professionals should consider.
One major concern is the risk of chemical residue left on tools after soaking. This residue can potentially cause skin irritation or allergic reactions in clients, undermining your professional credibility.
Chemical residue on tools can lead to skin irritation or allergic reactions in clients, jeopardizing your professional reputation.
Additionally, the soaking solution effectiveness may diminish over time, especially if the solution becomes contaminated or improperly diluted.
Moreover, certain materials may not withstand prolonged exposure to chemical agents, leading to tool degradation.
It’s essential to regularly monitor the solution’s potency and adhere to manufacturer guidelines to guarantee ideal disinfection.
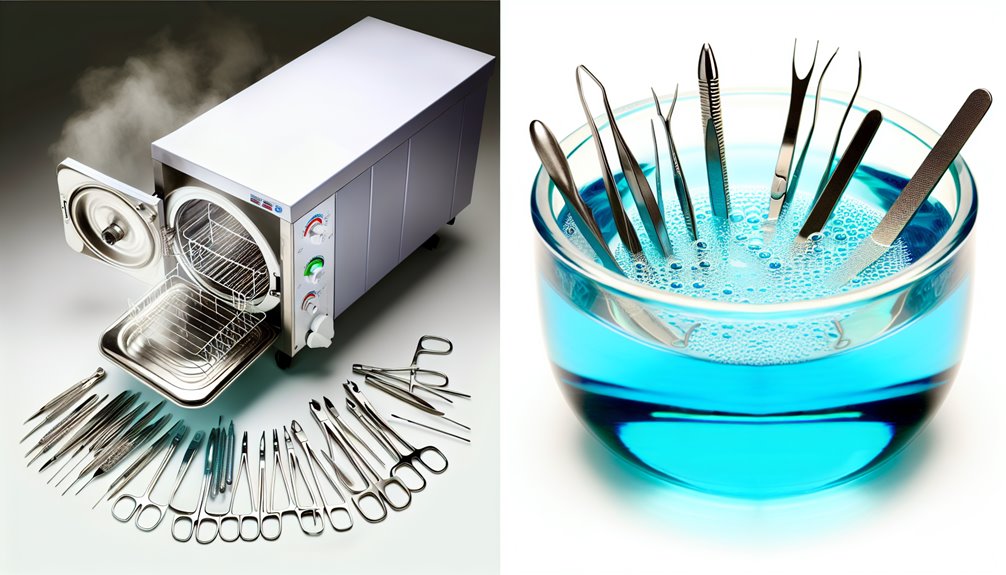
Comparing Effectiveness: Autoclave vs. Chemical Soak
When it comes to disinfecting nail tools, comparing the effectiveness of autoclaving and chemical soaking is essential for ensuring client safety.
Both methods have their merits, but understanding their differences can enhance your fungal prevention strategies and tool maintenance tips.
- Autoclaves eliminate fungi through high-pressure steam, ensuring thorough sterilization.
- Chemical soaks may leave behind residues if not properly rinsed, potentially compromising safety.
- Time efficiency varies; autoclaves require more time but provide a higher guarantee of sterility.
Ultimately, while chemical soaking might be convenient, autoclaving is the gold standard for complete disinfection.
Prioritizing effective methods will protect your clients and maintain your reputation in the industry.
Best Practices for Using an Autoclave
When using an autoclave, following best practices is essential for effective disinfection.
You’ll need to pay attention to proper loading techniques, guarantee the right temperature and time settings, and keep up with regular maintenance and calibration.
Implementing these practices will help you achieve ideal results and maintain the integrity of your nail tools.
Proper Loading Techniques
To guarantee effective sterilization of nail tools in an autoclave, you need to follow proper loading techniques. This secures proper tool arrangement, maximizing sterilization efficiency and safeguarding your clients’ health.
Here are three best practices to adopt:
- Avoid overcrowding: Ascertain tools have enough space for steam circulation, preventing any unsterilized areas.
- Position tools correctly: Place heavier instruments on the bottom and lighter ones on top to prevent damage and ascertain uniform exposure.
- Use appropriate containers: Utilize perforated trays to allow steam penetration while keeping tools organized.
Temperature and Time Settings
After ensuring proper loading techniques, the next key factor in achieving effective sterilization in an autoclave is understanding the right temperature and time settings. Mastering temperature control and time optimization is essential for ensuring that your nail tools are adequately disinfected. Typically, a temperature of 121°C (250°F) for 15-30 minutes is effective. However, the specifics may vary based on your autoclave model and load type. Always consult your device’s manual for precise settings.
| Temperature (°C) | Time (minutes) | Load Type |
|---|---|---|
| 121 | 15 | Solid instruments |
| 134 | 3-5 | Wrapped tools |
| 160 | 60 | Glassware |
| 180 | 30 | Metal tools |
Maintenance and Calibration
Maintaining and calibrating your autoclave is essential for guaranteeing consistent sterilization results.
To achieve mastery in using this critical equipment, adhere to structured maintenance schedules and follow thorough calibration procedures. Here are three best practices you should implement:
- Regularly inspect and clean the autoclave’s interior and exterior to prevent contamination and promote peak performance.
- Document calibration checks on a monthly basis, ensuring that temperature and pressure gauges function accurately.
- Train your staff on proper usage and maintenance protocols, fostering a culture of safety and precision.
Best Practices for Chemical Soaking
While guaranteeing the safety of your clients, chemical soaking of nail tools is an essential practice for eliminating fungal contaminants.
To maximize disinfectant effectiveness, select an EPA-registered disinfectant specifically designed for nail tools. Always follow the manufacturer’s instructions regarding dilution ratios and contact time, as improper use can compromise chemical soak safety.
Select an EPA-registered disinfectant for nail tools and always adhere to the manufacturer’s instructions for safe use.
Before soaking, thoroughly clean your tools to remove debris, as this enhances the disinfectant’s efficacy. Confirm that tools are fully submerged and avoid overcrowding, which can prevent proper contact with the disinfectant.
After the recommended soaking time, rinse the tools with clean water and air dry to remove any residual chemicals.
Adhere to these best practices for ideal results in maintaining a safe and hygienic nail care environment.
Making the Right Choice for Your Nail Care Routine
Choosing the right products for your nail care routine is essential, especially when dealing with potential fungal exposures.
Prioritizing effective tool hygiene can make a significant difference in maintaining your nail health. Here are three key considerations for your routine:
- Quality Disinfectants: Invest in high-quality disinfectants specifically designed for nail tools to guarantee thorough sanitation.
- Regular Autoclaving: If possible, use an autoclave for sterilizing metal tools; it offers the highest level of hygiene.
- Safe Storage Solutions: Store your tools in a clean, dry environment to prevent contamination between uses.
Final Thought
In the battle against fungal infections, choosing the right method to disinfect your nail tools is vital. Whether you opt for the thorough embrace of an autoclave or the swift touch of a chemical soak, remember that your tools are your knights in shining armor. Proper sterilization not only protects your clients but also enhances your reputation as a nail care professional. Armed with the right techniques, you can guarantee a safe and hygienic experience that wards off unwanted invaders.
Post Disclaimer
This post is based on research and expert insights, reviewed by healthcare professionals for accuracy. It is for informational purposes only and not a substitute for professional medical advice. Always consult a qualified healthcare provider before making health-related decisions.